VoIP Detective automatically backs up your entire database every night at midnight. This includes all call records, user accounts, and configuration settings. By default, backups are stored locally on the VoIP Detective appliance. While this protects against accidental data loss, it does not protect against disk failure or the appliance running out of space.
We strongly recommend configuring SFTP backups to stream your nightly backup to a separate server, NAS, or other storage device. With SFTP enabled, VoIP Detective streams the backup directly to your remote server — it does not need to save a local copy first, which means it works even when local disk space is limited.
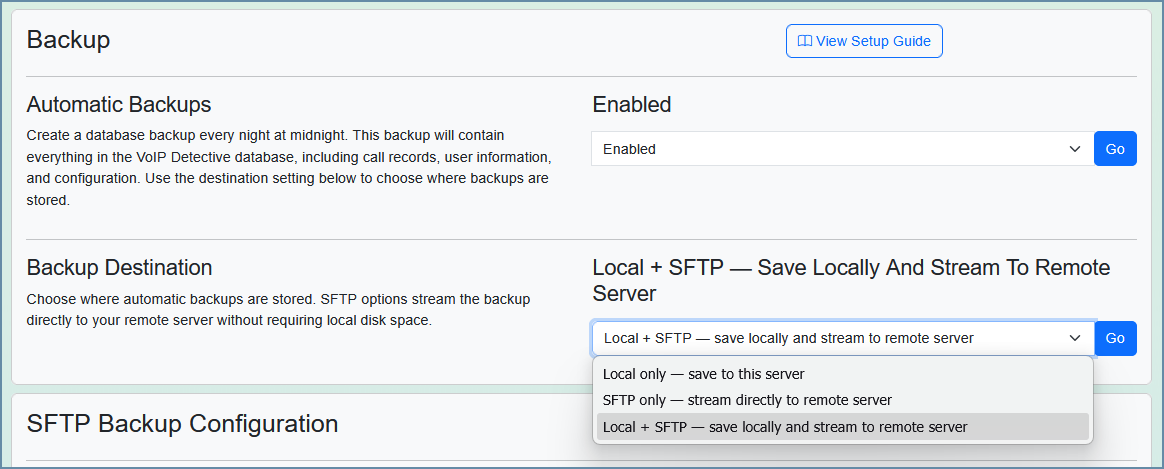
Enabling Automatic Backups
Navigate to Administration → Configuration and scroll down to the Backup section. Set Automatic Backups to Enabled.
Once enabled, a Backup Destination dropdown will appear with three options:
Destination | Description |
Local Only | Saves the backup to the local VoIP Detective appliance. This is the default. |
Remote Only | Streams the backup directly to your remote SFTP server. No local disk space is used. |
Local + Remote | Saves a local copy and simultaneously streams to your remote SFTP server. |
Choose the destination that fits your environment:
- Local Only is suitable for smaller deployments or when you have plenty of local disk space and are manually copying backups off the appliance.
- Remote Only is ideal when local disk space is limited. The backup streams directly to the remote server without writing anything locally. Note: if the remote server is unreachable, the backup will fail entirely — there is no local fallback.
- Local + Remote provides the best protection. You get a fast local copy for quick restores, plus an offsite copy for disaster recovery. This is the recommended option when disk space allows.
Configuring Remote Backups
When the backup destination includes SFTP (either Remote Only or Local + Remote), a Remote Backup Configuration section will appear. You will need to provide the following:
Setting | Description |
Host | The hostname or IP address of your SFTP server. |
Username | The username used to log in to the SFTP server. |
Password | The password used to log in to the SFTP server. |
Port | The SFTP port. This is typically 22. |
Directory | The directory on the remote server where backups should be stored. Include the trailing slash (e.g., / or /backups/). |
Backups to Keep | VoIP Detective will automatically delete older backups on the remote server, keeping only this many. |
Backup Frequency (Local + Remote Only)
When the destination is set to Local + Remote, an additional Backup Frequency option controls how often the remote SFTP leg runs:
- Daily — The backup is sent to the SFTP server every night. (Recommended)
- Weekly — The backup is sent to the SFTP server on Sundays only. Local backups still run every night.
- Monthly — The backup is sent to the SFTP server on the 1st of each month only. Local backups still run every night.
When set to SFTP Only, the backup always runs every night (there is no frequency option).
Installing Outbound SSH
In order to perform SFTP backups, outbound SSH must be installed on your VoIP Detective appliance. Newer versions of VoIP Detective have this installed, and the GUI will tell you if this install is needed. This is a one-time setup. You must be running VoIP Detective OS version 2.7 or higher (check Administration → System Status).
- Log into the VoIP Detective CLI (command line interface). You can use an SSH client such as PuTTY, or your hypervisor console. Use the username cliadmin.
- From the menu, choose the option to Configure Linux OS services.
- Select Configure SSH.
- Choose Install outbound SSH (for backups and remote SFTP server access).
- Press Enter when instructed. You may be required to re-enter the cliadmin password.
If outbound SSH is not installed and you attempt to configure SFTP backups, VoIP Detective will display an error message when the backup runs, with a link back to this article.
How the Backup Process Works
Understanding how VoIP Detective performs backups can help with troubleshooting:
- Environment validation — VoIP Detective checks that the required tools are installed, verifies disk space (for local backups), and tests the SSH connection (for SFTP backups).
- Database dump — The entire database is exported and compressed in a single streaming operation. If the destination includes SFTP, the compressed data is streamed directly to the remote server without writing an intermediate file to local disk.
- Backup verification — For local files, VoIP Detective verifies the compressed file integrity and checks for a completion marker to confirm the backup was not truncated. For SFTP-only backups, VoIP Detective verifies the remote file exists and is not empty.
- Cleanup — Old local backup files (older than 24 hours) are removed. On the remote SFTP server, older backups beyond the configured retention count are deleted.
- Failure notification — If the backup fails at any step, an alert email is sent to the administrator email address (if email is configured under Administration → Configuration).
The backup runs as a background job. You can monitor its progress in Administration → Job Queue.
Performing a Manual Backup
In addition to the automatic nightly backup, you can create a backup on demand from the Administration → Backups page. Manual backups support the same three destinations (Local, SFTP, Local + SFTP) and use the same streaming approach.
Manual backups are useful before performing a restore, an upgrade, or any major configuration change. They run in the background and you can monitor progress on the Backups page.
Accessing and Downloading Backups
There are several ways to access your backup files depending on how they were created and where they are stored.
Automatic Backups (Local)
Automatic backups that are saved locally are stored on the VoIP Detective file system. To download them, you will need an SFTP client such as FileZilla. Connect to VoIP Detective using the following credentials:
Setting | Value |
Host | The IP address or hostname of your VoIP Detective appliance |
Username | voipdetective |
Password | voip (default — change this if you have updated it) |
Port | 22 |
Once connected, navigate to the /backup folder. You will see the automatic backup files (named backup_YYYY-MM-DD.sql.gz). Download the file you need to your local machine.
Tip: For more information about using SFTP to access files on VoIP Detective, see the Using SFTP to access files article in the knowledge base. |
Automatic Backups (SFTP Remote)
If your backup destination is set to SFTP Only or Local + SFTP, backups are stored directly on your remote SFTP server in the directory you configured. Access them using your normal method for that server (file manager, SFTP client, etc.).
Manual Backups
Manual backups can be managed from the Administration → Backups page in the VoIP Detective web interface. From this page you can download previously created backup files. Backup files are stored securely outside the web root and are only accessible to administrators.
Restoring a Backup
VoIP Detective can restore from any previously created backup file. The restore process will replace all data in the current database with the contents of the backup. This includes call records, user accounts, and all configuration.
Warning: Restoring a backup will permanently delete all current data. Create a manual backup of your current database before proceeding. |
Uploading a Backup File for Restore
If the backup file you want to restore is not already on the appliance, you will need to upload it using an SFTP client. Connect to VoIP Detective using the credentials above and upload your .sql.gz file to the /restore folder.
Starting a Restore
- Navigate to Administration → Backups and go to the restore section.
- VoIP Detective will detect any backup files in the restore directory and list them.
- Select the backup file you want to restore and confirm. You will be warned that all current data will be deleted.
- The restore runs in the background. You can leave the page and return later to check progress. Large databases may take hours to restore.
You can monitor restore progress in Administration → Job Queue. During a restore, the system will be temporarily unavailable and other background jobs (such as CDR imports) will be paused until the restore completes.
Troubleshooting
Backup fails with “sshpass not found” or “Outbound SSH is not installed”
Outbound SSH needs to be installed on the appliance. Follow the steps in the Installing Outbound SSH section above.
Backup fails with “Remote server connection failed”
VoIP Detective could not connect to your SFTP server. Verify the host, port, username, and password are correct. Ensure your SFTP server is reachable from the VoIP Detective appliance and that the firewall allows outbound connections on the SFTP port (typically 22).
Backup fails with “Insufficient disk space”
The local disk does not have enough free space to store the backup. Consider switching the backup destination to SFTP Only to bypass local disk usage entirely, or free up space on the appliance.
Backup completes but the file appears truncated or corrupt
VoIP Detective verifies each backup for completeness. If a backup passes verification but appears corrupt during restore, please contact VoIP Detective support.
Previously configured FTP backups are no longer working
FTP backup support has been removed. Please reconfigure your remote backup using SFTP. Your existing connection settings (if previously configured) are still saved — you only need to change the backup destination.
Restore seems stuck or is taking a very long time
Large databases can take several hours to restore. Check the progress in Administration → Job Queue. The progress bar will update periodically with elapsed time. If the job appears stale (no updates for over 2 hours), it may have failed silently — check the Job Queue for error details.
FTP backups are not supported in VoIP Detective.
FTP users: FTP backup support has been removed from VoIP Detective and is no longer supported. Please reconfigure using SFTP by selecting a destination that includes SFTP and verifying your connection settings
Was this article helpful?
That’s Great!
Thank you for your feedback
Sorry! We couldn't be helpful
Thank you for your feedback
Feedback sent
We appreciate your effort and will try to fix the article