Reporting Groups
Reporting groups are saved lists of extensions, phone numbers, or UPNs that you can run team reports against, without setting up a manager account. They are useful when you need to report on a custom set of people or devices that doesn't already exist as a management hierarchy — for example, a project team, a virtual queue, or any ad-hoc group whose call activity you want to track.
Each reporting group is locked to a single calling platform: CUCM, Microsoft Teams, or Webex. Reporting groups can include users, hunt groups, auto-attendants, and other resource accounts.
Tip: Once a reporting group is created, it appears alongside managers in the Team Report search, and can also be saved into scheduled Tailored Reports.

Who Can Use Reporting Groups
Access to reporting groups depends on your user role:
- Administrators — can create, rename, edit, and delete reporting groups, and use them as targets in team reports and tailored reports.
- Global Managers — can use reporting groups in team reports and tailored reports, but cannot create or modify them.
- Standard Users and Managers — do not see reporting groups. Their searches are scoped to their own calls or their assigned team members.
Acessing Reporting Groups
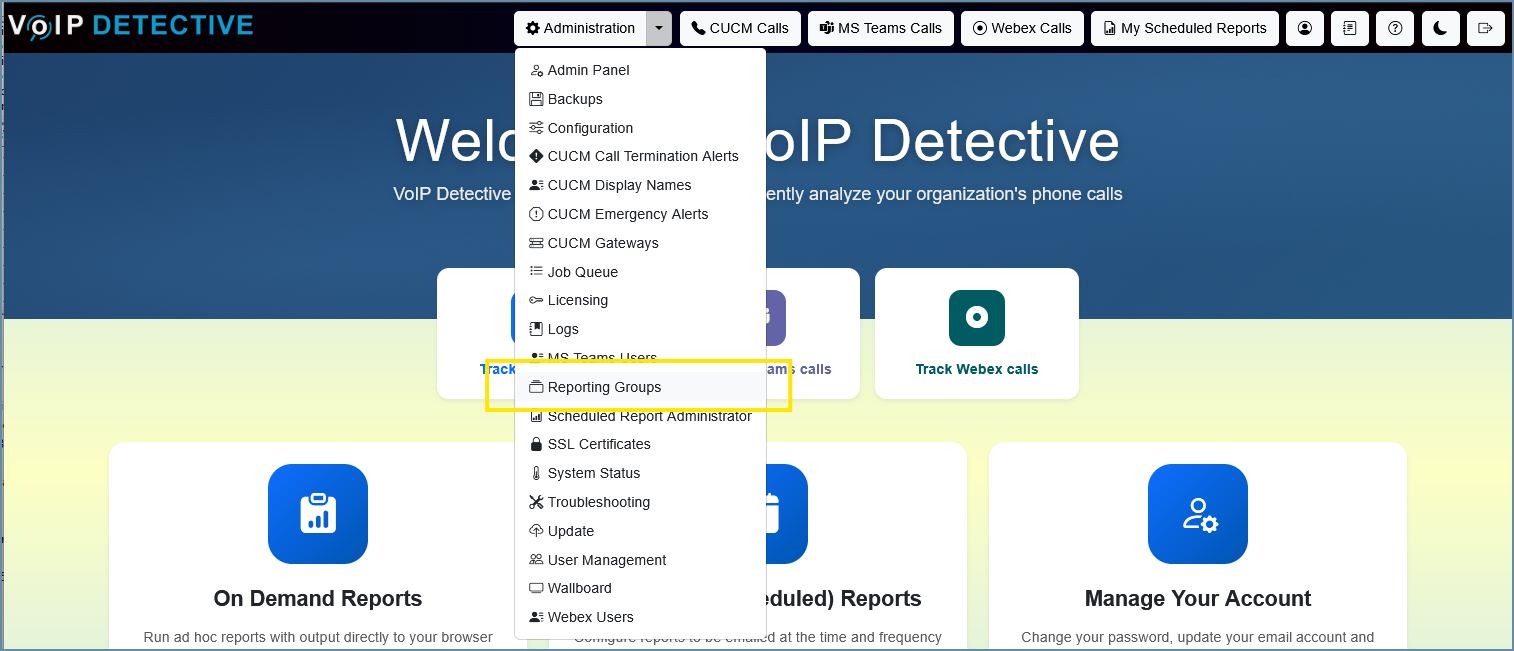
To access the Reporting Groups, click on the Administration dropdown and select "Reporting Groups".
Creating a Reporting Group
To create a new reporting group:
- Open the Administration menu and select Reporting Groups.
- In the "Create new reporting group" card at the top of the page, fill in the form:
- Name — a unique name for the group (e.g., "Sales Team", "After-Hours Queue").
- Description — optional. A short note explaining the purpose of the group.
- Platform — the calling platform this group belongs to (CUCM, Microsoft Teams, or Webex). Once set, the platform cannot be changed.
- Click Create new reporting group.
The new group appears in the "Existing reporting groups" list at the bottom of the page. Click its name to manage members, rename it, or update its description.
Note: A reporting group is locked to one calling platform. If you want to track the same set of people across CUCM and Microsoft Teams, you'll need two separate groups — one per platform.

Adding Members
After selecting an existing reporting group from the list, the manage card displays a textarea where you enter member identifiers. The placeholder text changes based on the group's platform to show the format you should use.
Per-Platform Identifier Rules
Each platform expects a specific format for member identifiers:
Platform | Accepts | Examples |
CUCM | Extensions (digits only) | 5551234, 20015, +17477722005, #44324 |
Microsoft Teams | UPNs (email format) | alice@company.com, support-queue@company.com |
Webex | Phone numbers (optional + followed by 7-15 digits) | +17577200045, 15551234567 |
For Microsoft Teams, UPNs work for users, hunt groups, auto-attendants, common area phones, conference rooms, and any other resource accounts in your Azure AD tenant — anything that has an Azure AD entry can be added by its UPN.
Bulk Adding Members
You can add multiple members in a single submission by separating values with commas, semicolons, spaces, or new lines:
alice@company.com, bob@company.com, charlie@company.com
Or each on its own line:
alice@company.com
bob@company.com
charlie@company.com
For CUCM groups, you can also use numeric ranges. The range 20005-20012 expands to eight individual extensions (20005, 20006, 20007, 20008, 20009, 20010, 20011, and 20012). Both - and .. syntax are supported.
A single submission can contain up to 1,000 values. If a range would expand beyond this limit, the entire submission is rejected.
Tip: When pasting from a spreadsheet column, spaces and line breaks are handled automatically — just paste the column contents and click Add member.
Validation Feedback
When you submit one or more values, VoIP Detective reports the result in a summary popup. The icon color reflects the overall outcome:
- Green — all values were added successfully
- Yellow — partial success; some values were added, some skipped or rejected
- Red — no values were added (entire submission rejected)
The summary breaks down the result into three counts:
Field | Meaning |
Added | Number of new members successfully inserted into the group |
Duplicates | Values that were already in the group and were skipped |
Failed | Values that could not be added — typically because they don't match the platform's expected format |
If any values failed, the first ten failed values are listed in the message so you can fix them and try again.
Note: Names like "Alice Smith" are not accepted as member identifiers, even on platforms where the call-lookup resolver might match them. Names introduce ambiguity whenever more than one person shares a name, and stop matching if a person's name changes. UPNs, extensions, and phone numbers are unique by definition and stable over time.
Managing an Existing Reporting Group
Click the name of a reporting group in the "Existing reporting groups" list to open its management view.

Renaming a Group
- Edit the Name field at the top of the card.
- Click Rename group.
The new name takes effect immediately. Existing tailored reports that reference this group continue to work, because they reference the group by its internal ID rather than by name.
Updating the Description
- Edit the Description field at the top of the card.
- Click Update description.
Removing a Member
In the Members list, click the Remove button next to the member you want to delete. The member is removed immediately. There is no undo, but the value can always be re-added.
Deleting a Group
To delete an entire reporting group, scroll to the "Delete reporting group" card and confirm the deletion when prompted.
Note: Deleting a reporting group also deletes all of its members. Any tailored reports that reference this group will produce empty results on their next run. Review your scheduled tailored reports before deleting any group.
Using Reporting Groups in Team Reports
Once you have created at least one reporting group, it becomes available as a search target in the Team Report for the same platform.
- Open the Team Report page for the appropriate platform.
- In the picker above the report parameters, you'll see a single dropdown that lists both reporting groups and managers. Reporting groups appear in their own group at the top of the list, before any managers.
- Select a reporting group to run the report against its members.
The team report behaves the same as if you had selected a manager: per-member call summaries, totals, charts, and the full set of export options (CSV, PDF, XLSX) are all available.
Tip: The picker only shows reporting groups for the platform you're currently searching in. A Microsoft Teams reporting group won't appear in the CUCM team report picker, even if you created both.

Using Reporting Groups in Tailored Reports
Reporting groups are particularly useful for Tailored Reports (scheduled reports). Once you've configured a team report against a reporting group, you can save those parameters as a tailored report. Each scheduled run uses the group's current member list — so as you add or remove members from the group, scheduled reports automatically reflect the change without any further configuration.
This is the most common reason to create a reporting group: rather than re-typing or re-selecting the same set of people every time you run a recurring report, you maintain the group once and the schedule does the rest.
Note: If you delete a reporting group that's referenced by a scheduled tailored report, that report will produce empty results on its next run. Audit your scheduled tailored reports before deleting any group.
Reporting Groups vs. Managers
Both reporting groups and managers can be used as targets for team reports. Here is a quick comparison:
Feature | Reporting Group | Manager |
Has a user account | No | Yes |
Can log in to VoIP Detective | No | Yes |
Can run their own searches | No | Yes |
Created by | Administrators only | Administrators only |
Locked to a single platform | Yes | No |
Member list managed via | Reporting Groups admin page | User Management |
Available in team report picker | Yes (admin / global manager only) | Yes |
Available in tailored reports | Yes | Yes |
Use a reporting group when you want a saved list of identifiers for reporting purposes only, with no associated user account. Use a manager when the person actually needs to log in to VoIP Detective and run their own searches over a team they manage.
Was this article helpful?
That’s Great!
Thank you for your feedback
Sorry! We couldn't be helpful
Thank you for your feedback
Feedback sent
We appreciate your effort and will try to fix the article